반응형

Tasks

Check that there is a Cloud SQL instance
Check that there is a user database on the Cloud SQL instance
Check that the blog instance is authorized to access Cloud SQL
Check that wp-config.php points to the Cloud SQL instance
Check that the blog still responds to requests
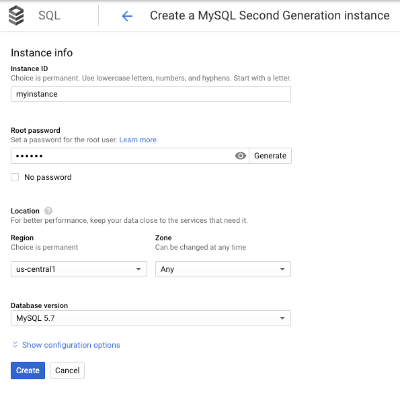
 

1. Create Cloud SQL


2. MySql dump 를 export 한다.


참고 )
https://cloud.google.com/solutions/migrating-mysql-to-cloudsql-concept
https://cloud.google.com/sql/docs/mysql/import-export/creating-sqldump-csv#std


- 실행 명령어

mysqldump --databases [DATABASE_NAME] -h [INSTANCE_IP] -u [USERNAME] -p \
--hex-blob --skip-triggers --single-transaction --set-gtid-purged=OFF \
--ignore-table [VIEW_NAME1] [...] --default-character-set=utf8mb4 > [SQL_FILE].sql


- 조건 

The existing database for the blog is provided by MySQL running on the same server. 
The existing MySQL database is called wordpress and the user called blogadmin with password Password1*, which provides full access to that database.


- 실행

위 조건에 맞춰서 다음과 같이 실행을 한다. password 는 위 조건에서 처럼 Password1* 를 넣어주면 된다.


3. Cloud Bucket 생성 및 dump 를 gcs 로 복사한다.


export PROJECT_ID=$(gcloud info --format='value(config.project)')
gsutil mb gs://$PROJECT_ID
gsutil cp wordpress.sql gs://$PROJECT_ID
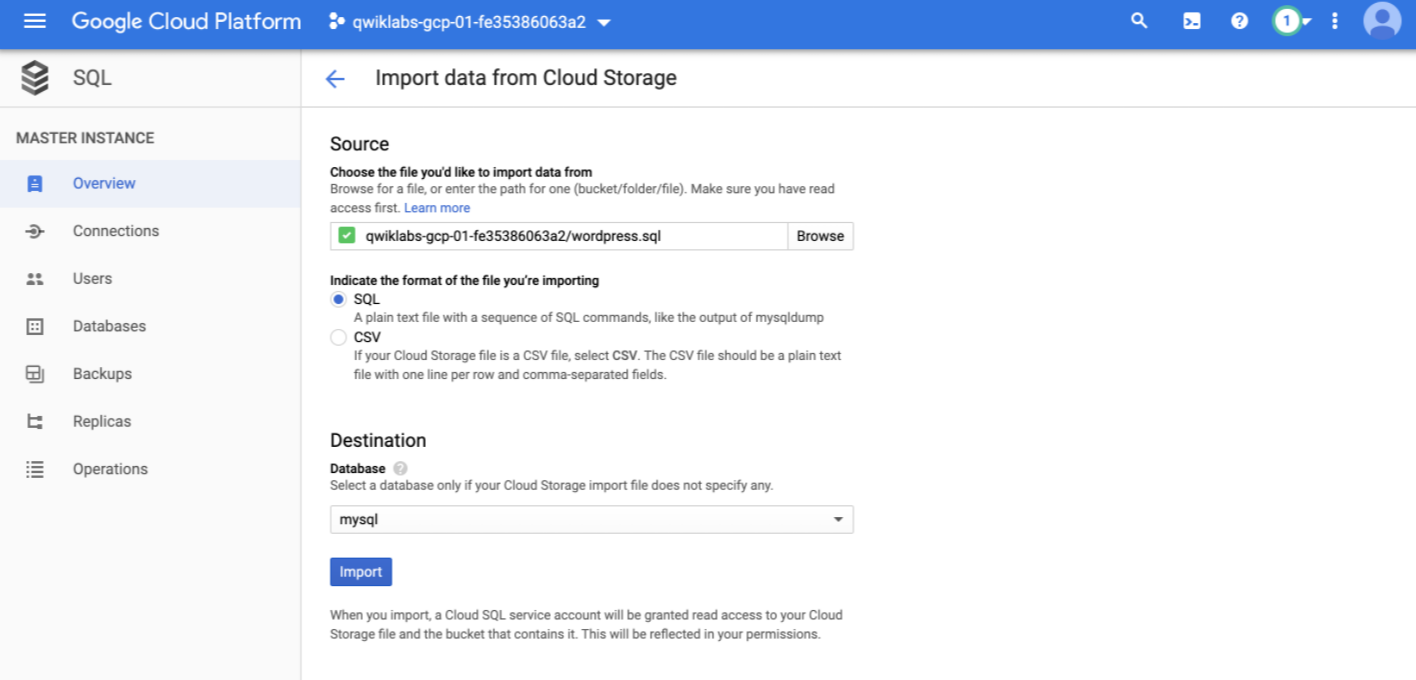
 

4. SQL 로 import 한다.


참고)

https://cloud.google.com/sql/docs/mysql/import-export/importing


명령어를 사용해도 되고 아래와 같이 화면에서 간단히 import 하면 더 편하다.
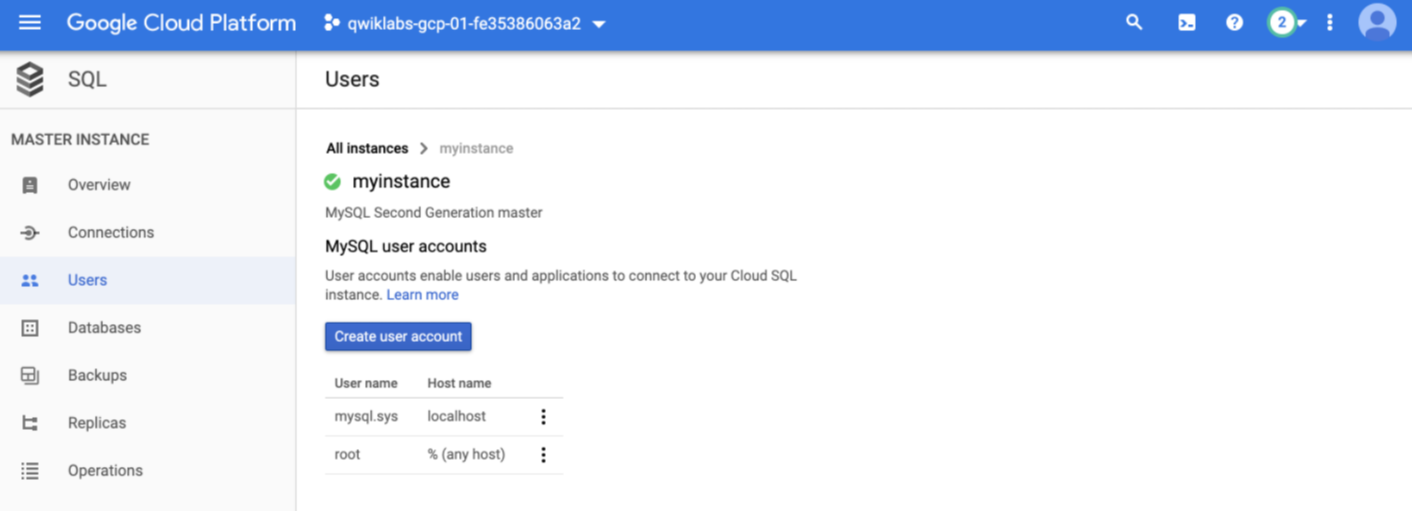
5. User 추가


SQL > Users 탭에서 Create user account 를 클릭한다.

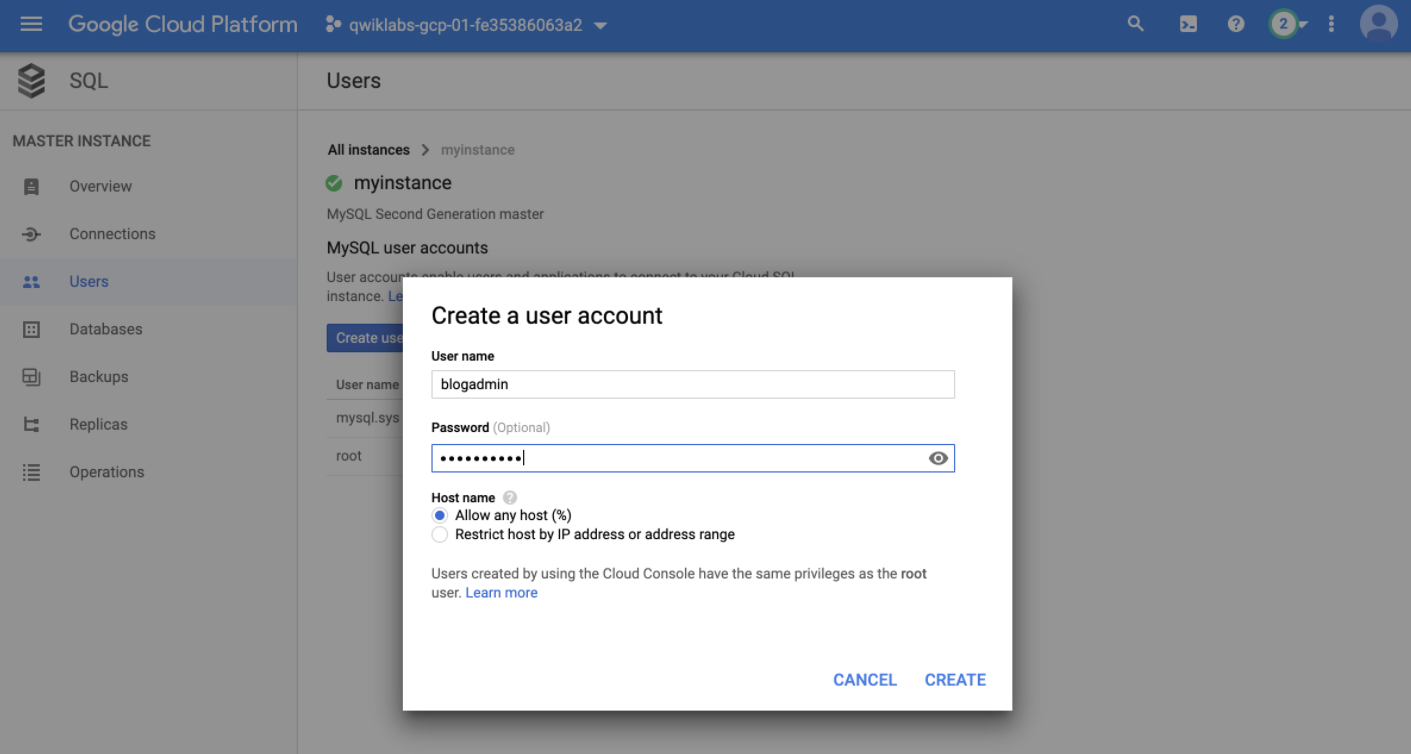
blogadmin 계정을 만들어 준다.

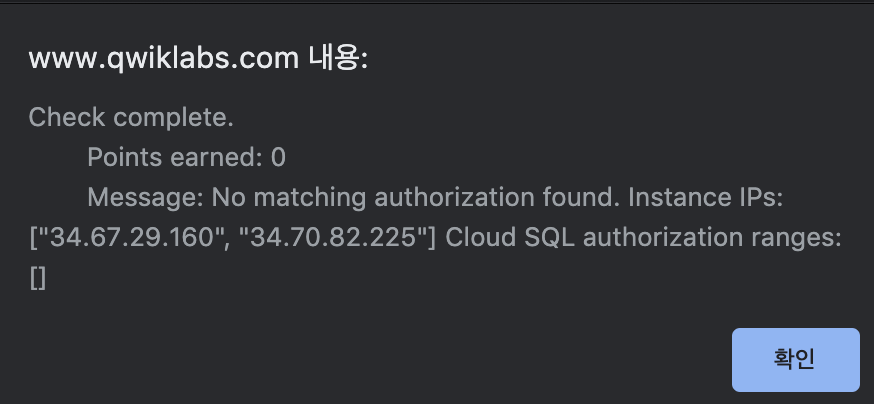
다 된줄 알았는데 아래와 같이 에러가 나온다. ㅡㅡ;

SQL>Connections 탭을 가보면 아래 화면과 같이 Network 설정을 할 수 있다.

Network 설정을 해줘야 하는데 위와같은 range 를 만족해야 한다.

아래 사이트를 가면 쉽게 CIDR range 를 구할 수 있다.

https://www.ipaddressguide.com/cidr


CIDR to IPv4 Address Range Utility Tool | IPAddressGuide

Free IP address tool to translate IPv4 address range into CIDR (Classless Inter-Domain Routing) format and vice-versa.

www.ipaddressguide.com

6. wp-config.php 파일을 Cloud SQL Instance 를 사용하도록 수정해준다.


wp-config.php 파일에 아래 localhost 를 수정해 하고 주석을 해제 한다. (위치는 /var/www/html/wordpress)

** MySQL hostname

*/ define('DB_HOST', 'localhost');
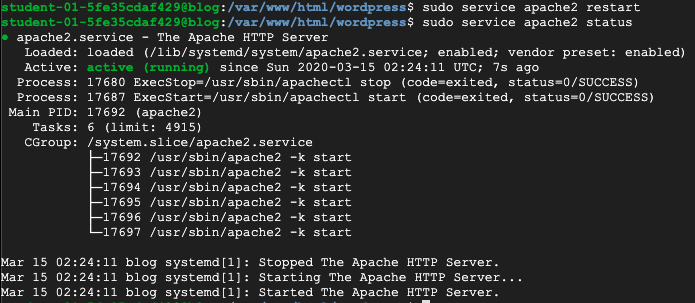


7. 이제 재기동 한다. 

sudo service apache2 restart


728x90
반응형
반응형

Tasks

Check that there is a tagged image in gcr.io for echo-app:v2
Echo-app:v2 is running on the Kubernetes cluster
The Kubernetes cluster deployment reports 2 replicas.
The application must respond to web requests with V2.0.0


1. 파일 압축 풀기 및 Docker Build


- 압축 풀기

tar -xvzf resources-ehco-web-v2.tar.gz

- PROJECT_ID 환경변수 등록

export PROJECT_ID=$(gcloud info --format='value(config.project)')

- Image 를 Google Container Registry 에 push


2. Version 수정

- echo-web-deployment.yml 파일 수정

아래에 있는 1.0 을  v2 로 변경한다.

- Image push

docker push gcr.io/${PROJECT_ID}/echo-web:v2

그리고 나서 화면에서 Action 에 있는 Rolling update 를 클릭한다.

Rolling Update 에서 image 는 조금전에 push 한 v2 이미지를 사용한다. 그리고 Update 클릭


- Scale 변경

Action  메뉴에서 Scale 을 클릭한후 Replicas 값을 2 로 입력한다.

완료가 되면 위에 보이는 Replicas 정보가 아래와 같이 변경된다.


Deployment Details 화면에 있는 yaml 탭에 가서 파일 내용을 살펴보면 spec.replicas 가 2 로 변경 되어 있는것을 볼 수 있다.


728x90
반응형
반응형

Tasks

An application image with a v1 tag has been pushed to the gcr.io repository
A new Kubernetes cluster exists (zone: us-central1-a)
Check that an application has been deployed to the cluster
Test that a service exists that responds to requests like Echo-app


1. 클러스터 생성


gcloud beta container --project "qwiklabs-gcp-00-337f72711928" clusters create "echo-cluster" --zone "us-central1-a" --no-enable-basic-auth --cluster-version "1.14.10-gke.17" --machine-type "n1-standard-2" --image-type "COS" --disk-type "pd-standard" --disk-size "100" --metadata disable-legacy-endpoints=true --scopes "
https://www.googleapis.com/auth/devstorage.read_only","https://www.googleapis.com/auth/logging.write","https://www.googleapis.com/auth/monitoring","https://www.googleapis.com/auth/servicecontrol","https://www.googleapis.com/auth/service.management.readonly","https://www.googleapis.com/auth/trace.append" --num-nodes "3" --enable-stackdriver-kubernetes --enable-ip-alias --network "projects/qwiklabs-gcp-00-337f72711928/global/networks/default" --subnetwork "projects/qwiklabs-gcp-00-337f72711928/regions/us-central1/subnetworks/default" --default-max-pods-per-node "110" --addons HorizontalPodAutoscaling,HttpLoadBalancing --enable-autoupgrade --enable-autorepair


클러스터 생성은 Cloud Console 에서 직접 하면 된다.

name 은 "echo-cluster" , machine-type 은 "n1-standard-2" 로 만들어 준다.


2. tar file 을 Google Cloud Storage 에서 복사한 후 압축을 푼다.


- Google Cloud Strage 에서 복사

gsutil cp gs://qwiklabs-gcp-00-337f72711928/echo-web.tar.gz .

- 압축 풀기
tar -xvfz echo-web.tar


3. Docker Build 및 Image Push

- Docker Build

- Image 확인

echo-app 이 생성된 것을 확인할 수 있다.


- GCR(Google Cloud Registry) 에 push 하기 위해서 Tag 를 변경해준다. 

export PROJECT_ID=$(gcloud info --format='value(config.project)')

docker tag echo-app:v1 gcr.io/${PROJECT_ID}/echo-app:v1

- Image 를 Cloud Registry 에 push

중간에 나는 project id 를 그대로 써줬는데 위에서 export 를 했기 때문에 ${PROEJCT_ID} 로 써줘도 된다.


4. GKE 에 Deploy 하기

Cloud Console  의 Container Registry 를 확인해 보면 위와 같이 push한 이미지를 확인 할 수 있다.

오른쪽에 ... 메뉴를 눌러보면 Deploy to GKE 버튼을 볼수 있다. 그걸 클릭한다. 


Image 는 "Exsiting conatiner images" 를 선택하고 좀전에 생성한 이미지를 선택해준다.


Application name 은 "echo-web" 이라고 해준다.

라벨에도 key에 app, value 에 echo-web 이라고 넣어준다.

Cluster 는 위에서 생성한 "echo-cluster" 를 선택한다.

그리고 "Deploy" 클릭.


5. 외부에서 접속 할수 있도록 expose 하기


Cloud Console 에서 Kubernetes Engine > Workloads 메뉴로 가면 echo-web 의 detail 정보로 들어가면 위와 같이 화면이 나온다.

화면 상단에 있는 Expose 버튼을 누른다.


port 를 80 으로 넣어주고 Target port 를 8080 으로 넣고 Expose 버튼을 누른다.


Expose 가 완료되면 위와같이 External endpoint 가 나타난다.


주소로 접속을 하게 되면 위와 같이 결과를 볼 수 잇다.

Cloud console 메뉴를 이용해서 만들었는데 직접 kubectl 명령어를 활용해서 만들어 보는것도 좋은 공부가 될것 같다.


728x90
반응형
반응형

GCP VM Instance 화면에서 ssh 버튼을 통하지 않고 Cloud Shell 에서 직접 SSH 를 접근 할 경우 쓰는 방법이다.


gcloud compute ssh --project [PROJECT_ID] --zone [ZONE] [INSTANCE_NAME]


cloud Shell 에 접근한후 다음과 같이 하면 된다.


먼저 instance list 를 조회한다.


gcloud compute instances list
NAME                          ZONE           MACHINE_TYPE   PREEMPTIBLE  INTERNAL_IP  EXTERNAL_IP    STATUS
myinstance       us-central1-a  n1-standard-1                          10.128.0.2   146.148.43.62  RUNNING


그리고 위에 명령어처럼 아래와 같이 접근을 하면 된다.

gcloud compute ssh --zone us-central1-a myinstance


간단하네~


참고 사이트

https://cloud.google.com/compute/docs/instances/connecting-to-instance

728x90
반응형
반응형

Tasks 

A new non-default VPC has been created
The new VPC contains a new non-default subnet within it
A firewall rule exists that allows TCP port 3389 traffic ( for RDP )
A Windows compute instance called vm-bastionhost exists that has a public ip-address to which the TCP port 3389 firewall rule applies.
A Windows compute instance called vm-securehost exists that does not have a public ip-address
The vm-securehost is running Microsoft IIS web server software.


1. Network 및 subnet 생성 

Network 와 subnet 이름은 둘다 securenetwork 로 한다.


- Network 생성

gcloud compute --project=qwiklabs-gcp-02-79731d4c62ae networks create securenetwork --subnet-mode=custom


- Subnet 생성

gcloud compute --project=qwiklabs-gcp-02-79731d4c62ae networks subnets create securenetwork --network=securenetwork --region=us-central1 --range=192.168.1.0/24


2. Firewall 생성

gcloud compute firewall-rules create myfirewalls --network securenetwork --allow=tcp:3389 --target-tags=rdp


target-tags 를 지정해야 나중에 instance의 network tag 를 지정할때 사용할 수 있다.


3. vm-securehost Instance 생성

gcloud beta compute --project=qwiklabs-gcp-02-46d92a9845e4 instances create vm-securehost --zone=us-central1-a --machine-type=n1-standard-2 --subnet=securenetwork --no-address --maintenance-policy=MIGRATE --service-account=365821737857-compute@developer.gserviceaccount.com --scopes=https://www.googleapis.com/auth/devstorage.read_only,https://www.googleapis.com/auth/logging.write,https://www.googleapis.com/auth/monitoring.write,https://www.googleapis.com/auth/servicecontrol,https://www.googleapis.com/auth/service.management.readonly,https://www.googleapis.com/auth/trace.append --image=windows-server-2016-dc-v20200211 --image-project=windows-cloud --boot-disk-size=50GB --boot-disk-type=pd-standard --boot-disk-device-name=vm-securehost --reservation-affinity=any


Instance 생성은 GCP 화면 에서 하는것이 더 편할 수도 있다. 위 스크립트도 화면에서 설정한 다음 command line 스크립트를 복사해 놓은 것이다.


4. vm-bastionhost Instance 생성

gcloud beta compute --project=qwiklabs-gcp-02-46d92a9845e4 instances create vm-bastionhost --zone=us-central1-a --machine-type=n1-standard-2 --subnet=securenetwork --network-tier=PREMIUM --maintenance-policy=MIGRATE --service-account=365821737857-compute@developer.gserviceaccount.com --scopes=https://www.googleapis.com/auth/devstorage.read_only,https://www.googleapis.com/auth/logging.write,https://www.googleapis.com/auth/monitoring.write,https://www.googleapis.com/auth/servicecontrol,https://www.googleapis.com/auth/service.management.readonly,https://www.googleapis.com/auth/trace.append --tags=rdp --image=windows-server-2016-dc-v20200211 --image-project=windows-cloud --boot-disk-size=50GB --boot-disk-type=pd-standard --boot-disk-device-name=vm-bastionhost --reservation-affinity=any


각각 Instance 생성시 주의 할 점은 vm-bastionhost 는 Network tag 에 위에서 firewall 생성시 썼던 target-tag 를 적어줘야 한다.

instance type 은 기본으로 선택되어있는 최소 사양이 아닌 다음 것으로 해주는게 좋다. 최소 사양은 나중에 구동시에 리소스가 부족해서 안되는 경우도 있다. 


5. 윈도우의 접속  ID 및 Password 는 화면에 나온대로 실행을 해준다.

그리고 나중에 securehost 접속시에도 위와 동일하게 vm-bastionhost 를 vm-securehost 로 번경해서 username 과 password 를 확인한 뒤 접속하면 된다.


728x90
반응형
반응형

Qwiklab 에 있는 코스중 하나인 Challenge: GCP ArchitectureConfigure a Firewall and a Startup Script with Deployment Manager 를 진행했다. 


그렇게 어렵지 않았는데 결과적으로 채점시스템의 오류로 인해서 거의 3시간의 시간을 투자했다.

처음에 하다가 오류를 못찾아서 타임오버나고, 두번째에도 동일한 곳에서 진행이 안되서 끙끙대다가 서비스데스크에 문의한 결과 채점시스템의 오류였다. (내시간... ㅠㅠ)


Task 목록은 아래와 같다. 

  • A new Deployment Manager deployment has been created
  • The deployment includes a virtual machine that has an embedded startup-script 
  • The virtual machine that has a startup-script also has a tag item called http
  • A firewall rule exists that allows port 80 (http) traffic and is applied using a tag with a value of http 
  • The virtual machine responds to web requests using the Apache web server
  • Check that Deployment manager includes startup script and firewall resources

1. Cloud Shell 에 project 를 설정한다. 

gcloud config set project [PROJECT_ID]


2. qwiklabs.yaml 파일 수정


- startup-script 추가

    metadata:
      items:
      - key: startup-script
        value: |
            #!/bin/bash
            sudo su -
            apt-get update
            apt-get install -y apache2
            cat <<EOF > /var/www/html/index.html
            <html><h1>Hello World</h1></html>
            EOF   


- tag 추가

    tags:
      items: ["http"]


- 방화벽에 tag 추가

- type: compute.v1.firewall
  name: default-allow-http
  properties:
    targetTags: ["http"]
    allowed:
    - IPProtocol: tcp
      ports: ["80"]
    sourceRanges: ["0.0.0.0/0"]

- 추가수정

instance 이름을 꼭 lab-monitor 라고 해야 한다.

그렇지 않으면 위 Task 중 아래 Task 를 완료할 수 없다. ㅡㅡ;

  • The virtual machine responds to web requests using the Apache web server

- 최종본

resources:
- type: compute.v1.instance
  name: lab-monitor
  properties:
    zone: {{ properties["zone"] }}
    machineType: https://www.googleapis.com/compute/v1/projects/{{ env["project"] }}/zones/{{ properties["zone"] }}/machineTypes/f1-micro
    # For examples on how to use startup scripts on an instance, see:
    #   https://cloud.google.com/compute/docs/startupscript
    tags:
      items: ["http"]
    metadata:
      items:
      - key: startup-script
        value: |
            #!/bin/bash
            sudo su -
            apt-get update
            apt-get install -y apache2
            cat <<EOF > /var/www/html/index.html
            <html><h1>Hello World</h1></html>
            EOF      
    disks:
    - deviceName: boot
      type: PERSISTENT
      boot: true
      autoDelete: true
      initializeParams:
        diskName: disk-{{ env["deployment"] }}
        sourceImage: https://www.googleapis.com/compute/v1/projects/debian-cloud/global/images/family/debian-9
    networkInterfaces:
    - network: https://www.googleapis.com/compute/v1/projects/{{ env["project"] }}/global/networks/default
      # Access Config required to give the instance a public IP address
      accessConfigs:
      - name: External NAT
        type: ONE_TO_ONE_NAT
- type: compute.v1.firewall
  name: default-allow-http
  properties:
    targetTags: ["http"]
    allowed:
    - IPProtocol: tcp
      ports: ["80"]
    sourceRanges: ["0.0.0.0/0"]

3. deployment 생성

gcloud deployment-manager deployments create myvm --config=qwiklabs.yaml


728x90
반응형
반응형

GCP Practice Exam 에서 풀고나서 오답에 대한 내용 체크한거.

(https://cloud.google.com/certification/practice-exam/cloud-architect?hl=ko)

코로나때문에 시험을 미룬게 잘된건지 아닌지 모르겠다..ㅠㅠ


TerramEarth case study

Q. Because you do not know every possible future use for the data TerramEarth collects, you have decided to build a system that captures and stores all raw data in case you need it later. How can you most cost-effectively accomplish this goal?
D. Have the vehicles in the field continue to dump data via FTP, and adjust the existing Linux machines to immediately upload it to Cloud Storage with gsutil.

B. Have the vehicles in the field pass the data to Cloud Pub/Sub and dump it into a Cloud Dataproc cluster that stores data in Apache Hadoop Distributed File System (HDFS) on persistent disks.
- B is not correct because although Cloud Pub/Sub is a fine choice for this application, Cloud Dataproc is probably not. The question posed asks us to optimize for cost. Because Cloud Dataproc is optimized for ephemeral, job-scoped clusters[2], a long-running cluster with large amounts of HDFS storage could be very expensive to build and maintain when compared to managed and specialized storage solutions like Cloud Storage[3].

Q. Your agricultural division is experimenting with fully autonomous vehicles. You want your architecture to promote strong security during vehicle operation. Which two architecture characteristics should you consider?
E. Treat every microservice call between modules on the vehicle as untrusted.
F. Use a Trusted Platform Module (TPM) and verify firmware and binaries on boot.

B. Require IPv6 for connectivity to ensure a secure address space.
- B is not correct because IPv6 doesn't have any impact on the security during vehicle operation, although it improves system scalability and simplicity.

Q. You analyzed TerramEarth’s business requirement to reduce downtime and found that they can achieve a majority of time saving by reducing customers’ wait time for parts. You decided to focus on reduction of the 3 weeks’ aggregate reporting time. Which modifications to the company’s processes should you recommend?
C. Increase fleet cellular connectivity to 80%, migrate from FTP to streaming transport, and develop machine learning analysis of metrics.

B. Migrate from FTP to streaming transport, migrate from CSV to binary format, and develop machine learning analysis of metrics.
- B is not correct because machine learning analysis is a good means toward the end of reducing downtime, and moving to streaming can improve the freshness of the information in that analysis, but changing the format doesn't directly help at all.


Mountkirk Games case study

Q. Mountkirk Games has deployed their new backend on Google Cloud Platform (GCP). You want to create a thorough testing process for new versions of the backend before they are released to the public. You want the testing environment to scale in an economical way. How should you design the process?
A. Create a scalable environment in GCP for simulating production load.


Q. You are designing a mobile chat application. You want to ensure that people cannot spoof chat messages by proving that a message was sent by a specific user. What should you do?
D. Use public key infrastructure (PKI) to encrypt the message client-side using the originating user’s private key.

C. Use a trusted certificate authority to enable SSL connectivity between the client application and the server.
- C is not correct because SSL only requires the server to have a signed certificate and does not require validating the client.

Q. 
To reduce costs, the Director of Engineering has required all developers to move their development infrastructure resources from on-premises virtual machines (VMs) to Google Cloud Platform. These resources go through multiple start/stop events during the day and require state to persist. You have been asked to design the process of running a development environment in Google Cloud while providing cost visibility to the finance department. Which two steps should you take?
A. Use persistent disks to store the state. Start and stop the VM as needed.
D. Use BigQuery billing export and labels to relate cost to groups.

F. Store all state in Cloud Storage, snapshot the persistent disks, and terminate the VM
- F is not correct because there is no need for persistent disks or snapshots if the state is to be stored in Cloud Storage.

728x90
반응형
반응형

App Engine 은 2가지 타입이 존재한다. 


1. Standard

* Easily deploy your application

* Autoscale workloads

* Free daily quota

* Usage based pricing


2. Flexible

* Web , Mobile application, continer based.


Flexible vs Standard

  Standard Flexible
Instance startup Milliseconds Minutes
SSH access No Yes
Write to local disk No Yes
Support for 3rd-party binaries No Yes
Network access Via App Engine service Yes
Pricing model After free daily use, pay per instance class, with automatic shutdown Pay for resource allocation per hour


Kubernetes Engine VS App Engine

  Kubernetes Engine App Engine Flexible App Engine Standard
Language support Any Any Java, Go, Python(특정 버전에 한함)
Service model Hybrid PaaS PaaS
Primary use case Container-based workloads

Web and mobile application,
Container-based workloads

Web and mobile application


참고

https://cloud.google.com/appengine/docs

https://www.coursera.org/learn/gcp-fundamentals/lecture/4ZurT/google-app-engine-flexible-environment

728x90
반응형
반응형


Dedicated Interconnect


출처 : https://cloud.google.com/interconnect/docs/concepts/dedicated-overview

On-premise 네트워크와 Google 의 네트워크를 물리적으로 연결해준다.

설정을 위해서는 Cloud Router 와 On-premise router 사이에 BGP 세션을 설정해줘야 한다.

99.9 ~ 99.99% 의 SLA 를 보장해 준다.


Partner Interconnect

출처 : https://cloud.google.com/interconnect/docs/concepts/partner-overview


Partner Interconnect는 Service Provider 를  통해서 On-premise 네트워크와 VPC 네트워크 간의 연결을 제공한다.

VPC 네트워크와 서비스 제공업체 네트워크 간의 연결에 한해 99.9 ~ 99.99% 의 SLA 를 보장해 준다.


https://www.coursera.org/learn/gcp-infrastructure-scaling-automation/lecture/OeoTK?t=90


Direct Peering


비즈니스 네트워크와 Google 에지 네트워크 사이를 연결할 수 있다.

다이렉트 피어링을 설정하면 온프레미스 네트워크에서 Google Cloud Platform 전체 제품군을 포함한 Google 서비스로 연결되는 직접 경로가 생성된다. 

Direct Peering 은 Google Cloud 외부에 존재한다. 따라서 G Suite 를 액세스 해야 하는 경우가 아니라면 Dedicated Interconnect 를 사용하는 것이 좋다.

SLA 를 보장하지 않는다.


Carrier Peering


서비스 제공 업체를 통해 G Suite 와 같은 Google 애플리케이션에 액세스 할 수 있다.


출처 : https://www.coursera.org/learn/gcp-infrastructure-scaling-automation/lecture/B0L3z/choosing-a-connection


728x90
반응형

+ Recent posts